
Peppermint Bark Cups

Tiny, festive peppermint bark cups layered with milk and white chocolate, bright peppermint flavor, and crunchy candy cane topping—perfect for holiday gifting or a quick sweet treat.

This peppermint bark cups recipe is one of those simple holiday projects that instantly transports the kitchen into seasonal territory. I discovered this combination during a December baking blitz years ago when I wanted something quick, giftable, and cheerful to hand out to neighbors. The contrast between a smooth milk chocolate base and a bright, peppermint-scented white chocolate layer studded with crushed candy cane is exactly the kind of small, indulgent thing that makes winter evenings feel special. The cups are just the right size for nibbling after dinner or slipping into a small gift bag.
What I love most about these cups is how easy they are to make and how professional they look with minimal effort. They require no tempering skills for a glossy finish, yet the layered effect reads as thoughtful and festive. I almost always keep a bag of good-quality milk and white chips in the pantry—Ghirardelli is my go-to for consistent flavor and texture—and a jar of crushed candy cane so I can assemble a batch in under an hour. They’re wonderful to make with kids, too: crushing candy canes and sprinkling the tops turns into an assembly-line of holiday cheer.
Why You'll Love This Recipe
- Quick assembly: most of the time is hands-off chilling and melting in 30-second bursts in the microwave, so you can have finished cups in about 45 minutes.
- Pantry-friendly ingredients: uses two standard 11–11.5 oz bags of chocolate chips and crushed candy cane—ingredients you can usually find at grocery stores all winter long.
- Family- and crowd-pleasing: the layers combine creamy milk chocolate and sweet, peppermint-scented white chocolate with a crunchy finish that everyone recognizes and loves.
- Make-ahead and giftable: stores well in the refrigerator or freezer, so you can prepare batches ahead of holiday gatherings or package them in tins for neighbors.
- Customizable: swap dark chocolate for a richer flavor, or use dairy-free chips for a vegan version; the technique remains the same.
I remember making these the first time with my niece—she insisted on sprinkling more candy cane than I recommended, and the extra crunch made it her favorite. Neighbors always appreciate a small tin of these at the door, and they travel well in a small box with parchment. Over the years I’ve adjusted the peppermint amount to be bright but not medicinal: 1/4 teaspoon of extract usually does the trick, with an optional splash more to taste.
Ingredients
- Milk chocolate chips (1 bag, 11.5 oz): Use a reliable brand like Ghirardelli for a smooth melting profile and balanced sweetness; the milk chocolate forms a rich, stable base for the cups.
- White chocolate chips (1 bag, 11 oz): Choose high-quality white chips (Ghirardelli or similar) that melt glossy and don’t seize easily; they provide the peppermint-scented top layer and contrasting color.
- Peppermint extract (1/4 teaspoon): Use pure peppermint extract rather than oil for better flavor integration; add a touch more if you prefer a stronger mint character.
- Candy cane crunch (1/3 cup): Finely crushed candy canes or hard peppermint candies give the signature crunch and festive look; you can buy pre-crushed bits or crush whole canes in a zip bag.
- Cupcake liners: Standard-size paper liners to hold 12 cups and make removal and gifting easier.
Instructions
Prepare the pan and liners: Line a 12-cup muffin pan with standard cupcake liners to ensure easy removal and neat presentation. Using liners prevents sticking and helps the cups hold their shape while chilling. Set the pan on a flat surface so the chocolate layers will level evenly. Melt the milk chocolate: Place the 11.5 oz bag of milk chocolate chips in a microwave-safe bowl. Heat in 30-second intervals on medium power, stirring thoroughly between each burst. The chocolate will look about three-quarters melted after the first minute; stirring encourages residual heat to finish melting without overheating. Stop microwaving when only small glossy streaks remain and stir until completely smooth—this should take about 1–2 minutes total. If chocolate overheats it can seize, so take a cautious approach. Form the milk chocolate shells: Divide the melted milk chocolate evenly among the 12 liners, spooning about 1 to 1 1/4 tablespoons per cup depending on the size of your liners. Tilt each liner slightly and use the back of the spoon to press the chocolate up the sides, creating a thin shell. Let the pan sit at room temperature for a few minutes so the shell sets slightly, or refrigerate for 5–8 minutes to speed the process—do not chill until the chocolate is fully hardened, or condensation can form when brought back to room temperature. Melt the white chocolate: Place the 11 oz bag of white chocolate chips in a clean microwave-safe bowl. Melt using the same 30-second interval method, stirring between bursts. White chocolate is more sensitive to heat; stop microwaving when the chips are almost melted and stir to finish. If the white chocolate thickens, a teaspoon of neutral oil or coconut oil can help smooth it (optional, 1/4 tsp). Add peppermint and candy cane crunch: Stir 1/4 teaspoon of peppermint extract into the melted white chocolate, taste carefully, and add a few drops more if you want a stronger mint note—peppermint extract is potent, so increase gradually. Fold in about 1/3 cup of candy cane crunch so the mixture is evenly studded and has both color and texture. Assemble the cups: Spoon the white chocolate mixture evenly over the milk chocolate shells, filling each liner to about three-quarters full. Sprinkle extra candy cane crunch on top of each cup for a decorative finish. Tap the pan lightly on the counter to level the tops and release any small air pockets. Harden and store: Let the cups set at room temperature until firm, or transfer to the refrigerator for 20–30 minutes to speed up the process. Once hardened, store the cups in an airtight container layered with parchment at cool room temperature for up to 5 days, in the refrigerator for 2 weeks, or frozen for up to 3 months. Return to room temperature briefly before serving for best flavor and texture.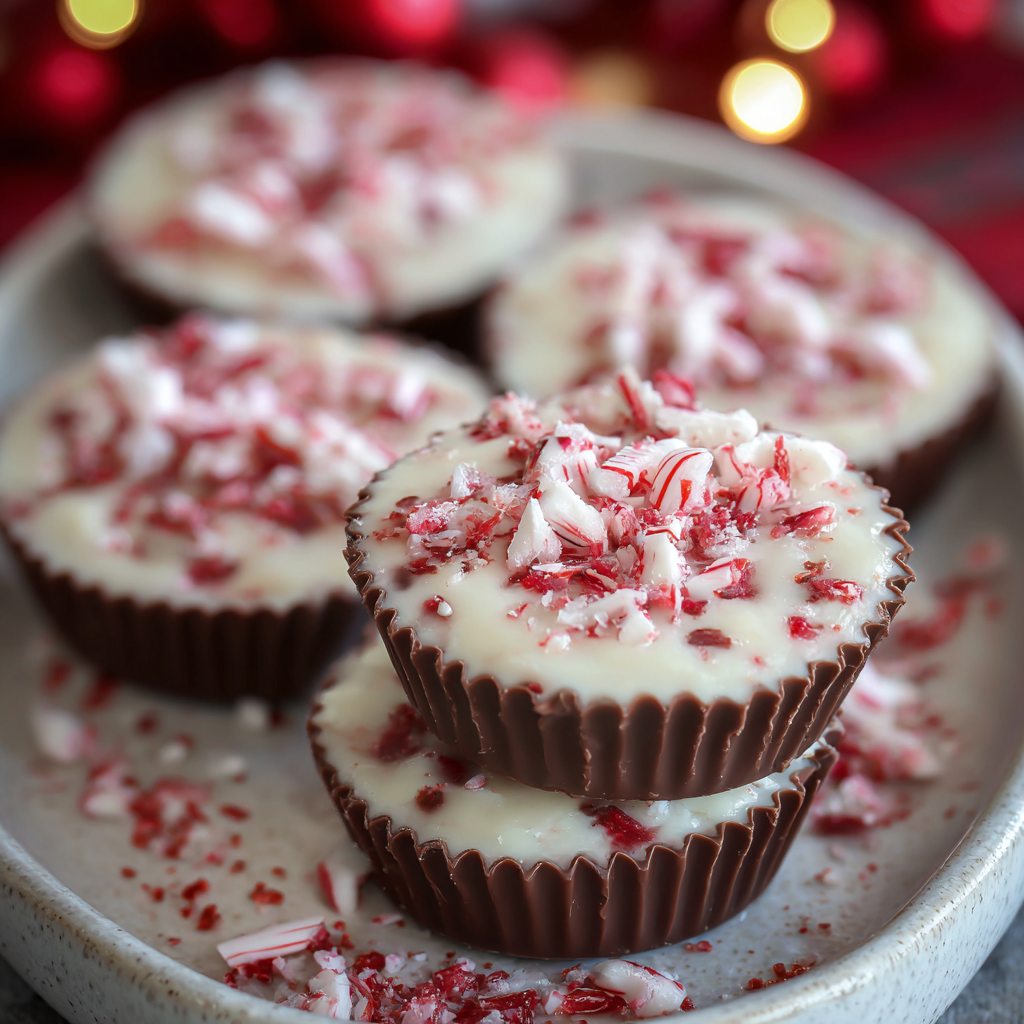
You Must Know
- Chill time: allowing about 20–30 minutes in the refrigerator will give the best snap and easiest removal from liners.
- Storage: keep in an airtight container; they freeze well for up to 3 months—thaw in the refrigerator overnight to avoid condensation.
- Allergy note: contains milk and soy (common in chocolate chips); check labels if serving someone with dietary restrictions.
- Texture tip: don’t overfill the liners; thin milk chocolate shells plus a slightly thinner white layer create the best bite balance.
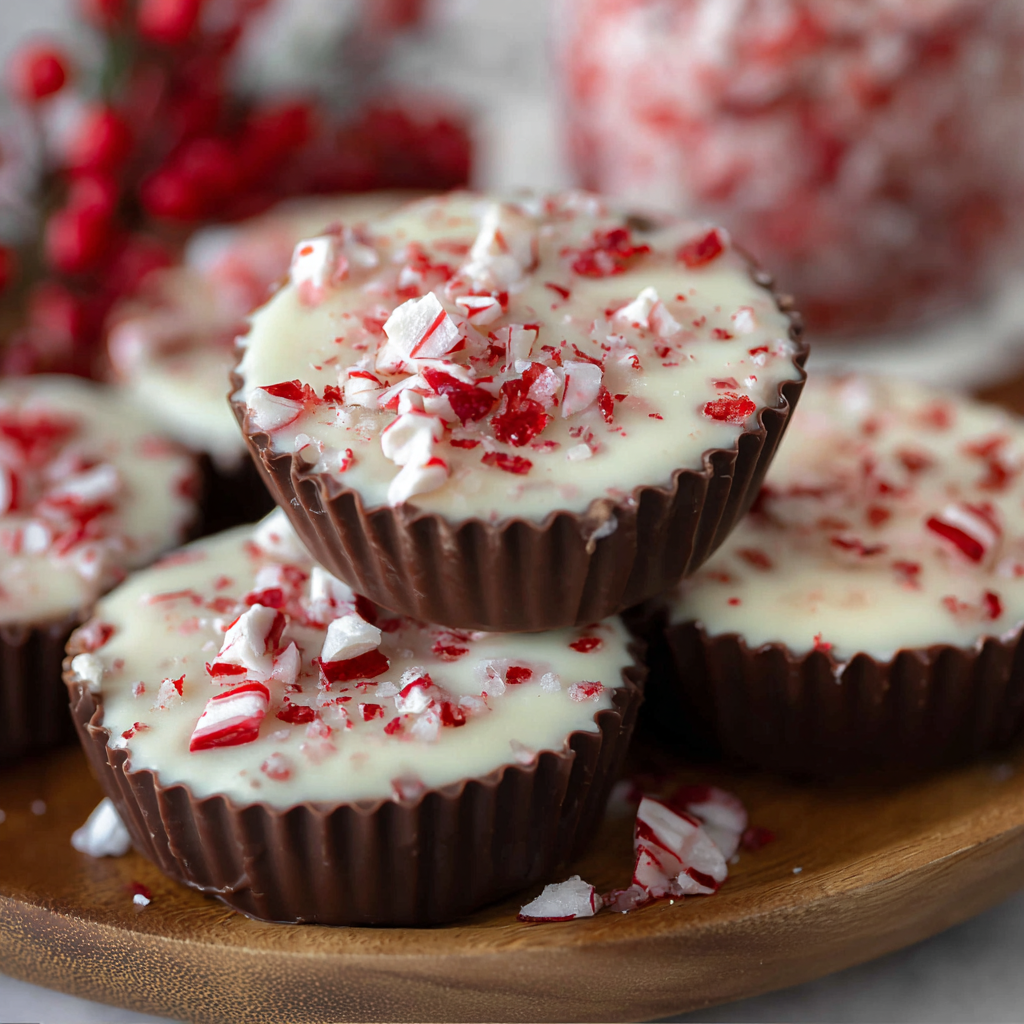
My favorite aspect is the contrast of textures—the creamy milk base with a cool, mint-scented white top studded with shards that crack satisfyingly when bitten. I’ve brought these to cookie swaps and holiday open houses; people always ask how long they take, and when I tell them under an hour—mostly waiting time—they’re pleasantly surprised. Making them with kids adds to the charm: the youngest family members love decorating the tops with leftover peppermint bits.
Storage Tips
Store finished cups in a single layer or in layers separated by parchment in an airtight container. At cool room temperature they’ll keep well for up to 5 days; refrigerate for longer storage—up to two weeks—or freeze for holiday prep (wrap the container tightly and place within a freezer-safe bag for up to 3 months). When removing from the fridge or freezer, avoid sudden temperature changes; thaw frozen cups overnight in the refrigerator to prevent condensation that can make the white chocolate look dull. For gifting, use small tins or boxes lined with tissue paper and include a desiccant packet to limit moisture.
Ingredient Substitutions
For a richer flavor, substitute the milk chocolate with 60–70% dark chocolate—use the same weight and allow for a slightly longer melt time. If you need a dairy-free version, select vegan dark and white chocolate chips made from cocoa butter and plant-based milk substitutes; note the texture and sweetness will vary. You can replace candy cane crunch with crushed peppermint candies or even peppermint-flavored chocolate pieces. If pure peppermint extract is too strong or unavailable, use 1/2 teaspoon of finely grated fresh peppermint (uncommon) or 1 teaspoon of peppermint oil diluted across a larger batch—use sparingly and taste as you go.
Serving Suggestions
Present these cups on a festive platter lined with parchment or in small paper cups for a polished look. They pair beautifully with hot beverages—espresso, hot chocolate, or a minty tea—and make an elegant palate cleanser between heavier dessert courses. For parties, arrange on a tiered tray with other small sweets, or pack a few in a cellophane bag tied with ribbon for quick hostess gifts. Garnish with extra crushed candy cane, a light dusting of cocoa powder, or even a tiny sprig of rosemary for an herbal counterpoint.
Cultural Background
Peppermint bark traces its modern popularity to holiday confectionery traditions that pair chocolate with mint for winter celebrations, inspired by classic European peppermint and chocolate combinations. The idea of layering contrasting chocolates and candies reached North American seasonal candy culture in the 20th century and became widely commercialized as a festive treat. Today, peppermint bark and its small-format variants like these cups are synonymous with holiday gatherings, cookie swaps, and seasonal gifts.
Seasonal Adaptations
In winter, stick with the classic peppermint candy. For a spring twist, substitute crushed freeze-dried raspberries for the candy cane and use white chocolate tinted pastel pink. For a Halloween version, swap peppermint for orange oil and use dark chocolate with crushed candied orange peel. Summer gatherings benefit from a mint-lemon combo—add a tiny amount of lemon zest to the white chocolate and top with chopped peppermint leaves for a fresher finish.
Meal Prep Tips
To scale up for gifting, prepare multiple batches of shells and freeze them on a flat tray before filling—this keeps the shell shape consistent. Work in an assembly line: melt two bowls of chocolate, have one person spoon shells, another prepare the white layer, and a third sprinkle toppings. Label containers with dates when freezing, and keep an extra supply of liners on hand to speed up assembly. For consistent portioning, use a small cookie scoop or a tablespoon measure to distribute both layers evenly.
These peppermint bark cups are a small, joyful holiday project: quick, adaptable, and satisfying to make. Whether you’re making a dozen for your family or several dozen for gifts, they deliver the bright, minty finish everyone expects from a seasonal treat—make them your own and enjoy the smiles they bring.
Pro Tips
Heat chocolate in 30-second intervals and stir thoroughly between bursts to avoid seizing.
Use parchment or cupcake liners for easy removal and clean presentation.
Taste the white chocolate after adding peppermint; add more extract in tiny amounts to avoid overpowering the candy notes.
If white chocolate becomes too thick, add 1/4 teaspoon of neutral oil to smooth it.
This nourishing peppermint bark cups recipe is sure to be a staple in your kitchen. Enjoy every moist, high protein slice — it is perfect for breakfast or as a wholesome snack any time.
Tags
Peppermint Bark Cups
This Peppermint Bark Cups recipe makes perfectly juicy, tender, and flavorful steak every time! Serve with potatoes and a side salad for an unforgettable dinner in under 30 minutes.
Instructions
Line the muffin pan
Line a 12-cup muffin pan with standard cupcake liners to ensure easy removal and neat presentation.
Melt the milk chocolate
Place the milk chocolate chips in a microwave-safe bowl and heat in 30-second intervals on medium power, stirring between each interval until smooth and fully melted.
Form chocolate shells
Divide melted milk chocolate evenly among liners and press some up the sides to form thin shells. Let sit a few minutes or chill 5–8 minutes to set slightly.
Melt the white chocolate
Melt white chocolate chips in a clean microwave-safe bowl using 30-second intervals, stirring to a smooth consistency. Add 1/4 teaspoon peppermint extract and stir in candy cane crunch.
Assemble cups
Spoon the white chocolate mixture over the milk chocolate shells, top with additional candy cane crunch, tap to level, and chill until firm.
Harden and store
Allow cups to harden at room temperature or in the refrigerator for 20–30 minutes. Store in an airtight container, refrigerated for up to two weeks or frozen for up to three months.
Last Step: Please leave a rating and comment letting us know how you liked this recipe! This helps our business to thrive and continue providing free, high-quality recipes for you.
Nutrition
Did You Make This?
Leave a comment & rating below or tag
@festive-cooks on social media!
Categories:
You might also like...

Air Fryer Parmesan Crusted Chicken
Crispy, golden Parmesan crusted chicken made in the air fryer for a quick family favorite that stays juicy inside and crunchy outside.

Quick Chicken Pot Pie Pasta
A cozy one-skillet mashup of pot pie comfort and egg noodle ease—ready in about 35 minutes and perfect for weeknight dinners.
Hot Fudge Brownie Bread
A gooey, chocolate-packed loaf with a molten hot-fudge swirl — brownie texture in bread form, perfect warm with a scoop of ice cream.
Did You Make This?
Leave a comment & rating below or tag @festive-cooks on social media!
Rate This Recipe
Share This Recipe
Enjoyed this recipe? Share it with friends and family, and don't forget to leave a review!
Comments (1)
This recipe looks amazing! Can't wait to try it.
Comments are stored locally in your browser. Server comments are displayed alongside your local comments.

Hi, I'm Jessica!
What's Popular
30-Minute Meals!
Join to receive our email series which contains a round-up of some of our quick and easy family favorite recipes.