>>

Creamy peppermint centers dipped in dark chocolate — a simple, nostalgic treat you can make at home for holidays, gifts, or any sweet craving.
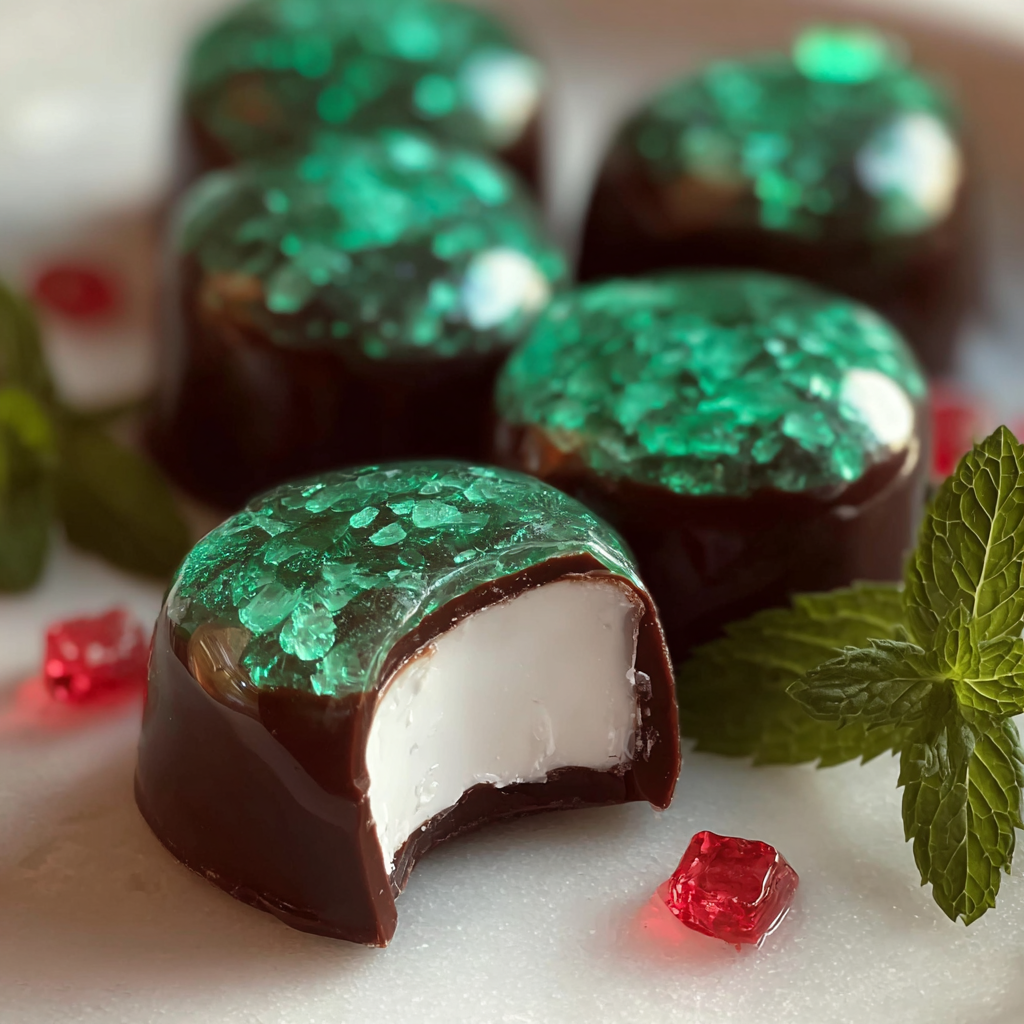
This mint candy recipe has been a festive staple in my kitchen for years. I first stumbled on the combination of sweetened condensed milk and powdered sugar while searching for an easy homemade candy to package as holiday gifts. The result was a smooth, silky peppermint center that tastes like a cross between a classic candy cane and a fondant mint, all wrapped in a thin layer of dark chocolate. The texture is pleasantly chewy yet melts on the tongue, with a bright peppermint finish that feels celebratory and comforting at the same time.
I discovered this recipe during a snowy December afternoon when the power flickered and the oven sat unused; working at the counter with just a mixer, simple ingredients, and a playlist of holiday songs, the idea came together. Since then I’ve made several small batches for neighbors, birthday parties, and as last-minute hostess gifts. Every time I bring out the tray, someone remarks on how homemade candy tastes somehow more sincere than store-bought — and it disappears fast. The key is balance: not too sweet, a clear peppermint punch, and chocolate just thin enough to snap.
From my first nervous batch to the neat stacks I now tie up in cellophane, this recipe has been an exercise in refinement. My family especially loves the contrast between the cool peppermint center and the rich dark chocolate shell. The first time I served them, my partner said they tasted like a gourmet version of classic mints — a compliment I still smile about.

My favorite aspect of this preparation is the ritual of assembly: rolling the dough, cutting the rounds, and the satisfying tap of excess chocolate falling back into the bowl. Family members often fight over the first tray because the aroma of peppermint and dark chocolate is irresistible. For gifting, I arrange them in small tins with parchment rounds — people tell me the homemade ones feel more personal and flavorful than anything you can buy.
Store finished candies in a single layer separated by parchment in an airtight container in the refrigerator for up to two weeks. For longer storage, freeze them in a rigid container for up to three months; thaw in the fridge before serving to avoid condensation on the chocolate. When packaging for gifts, keep the candies cool and away from direct sunlight. If you must ship them, include an insulated liner and ice packs for warm weather. Always allow the chocolate to set fully at refrigerator temperature before stacking to prevent smudging.
If you don’t have sweetened condensed milk, you can make a quick substitute by simmering evaporated milk with sugar until it reduces and thickens, though textures may vary slightly. For a lighter mint flavor, use 1 teaspoon peppermint extract and add more to taste; for a more intense profile, increase by 1/4 teaspoon. If dairy is a concern, try a dairy-free condensed milk alternative and use vegan chocolate for dipping, keeping in mind that consistency and flavor may shift. White chocolate offers a sweeter, milky alternative while keeping the peppermint character intact.
Serve these mint candies on a festive platter with a mix of other small confections such as salted caramels and roasted nuts. They work beautifully as an after-dinner palate cleanser or alongside coffee and espresso. Garnish with a tiny mint leaf or a sprinkle of cocoa powder for an elegant touch. For parties, arrange them in small paper cups or on tiered dessert stands; they also pair well with dessert wines, port, or a dark roast coffee to balance sweetness.

Mint-flavored confections have a long history in many culinary traditions, from European after-dinner mints to the candy canes associated with holiday celebrations. The idea of a sweet, minty center covered in chocolate is a modern fusion inspired by British fondant mints and American dipped confections. These small, portable treats were popularized as homemade gifts and became a symbol of hospitality—offering a small, hand-prepared candy is an intimate way to say you care.
For winter holidays, use red and green sprinkles or crushed candy cane on top for a festive crunch. In spring, swap peppermint extract for spearmint or add a drop of green food coloring to the dough for a softer hue. For summer gatherings, consider dipping half of each candy in white chocolate and topping with citrus zest for a bright twist. The basic technique adapts well to seasonal flavors and decorations, so you can match the candy to any occasion.
To streamline production, prepare the peppermint centers a day in advance and freeze them on a tray; when you’re ready, melt the chocolate and dip them in batches. Use a shallow bowl for dipping and a fork to transfer candies, keeping the work area cool. Label containers with dates, and when freezing, stack layers with parchment to prevent sticking. This approach saves time and makes it easy to produce large quantities for parties or gifts without last-minute stress.
Making these mint candies always brings me back to simple kitchen pleasures: music on, warm hands dusted with powdered sugar, and the satisfaction of a neat, chocolate-coated bite. I hope you enjoy them as much as my family does — and that they become a new favorite for your gatherings and gifts.
Dust your work surface lightly with powdered sugar to prevent sticking and to reduce additional sugar incorporation into the centers.
Chill the cut centers before dipping to maintain shape and prevent melting when they contact warm chocolate.
Use a fork or dipping tool and tap off excess chocolate to achieve a thin, even coating and avoid thick chocolate shells.
If the chocolate thickens as you work, warm it briefly in 10-second bursts and stir thoroughly to restore fluidity.
This nourishing homemade mint candy recipe is sure to be a staple in your kitchen. Enjoy every moist, high protein slice — it is perfect for breakfast or as a wholesome snack any time.
Yes. Freeze the centers in a single layer first, then transfer to an airtight container. They will keep for up to 3 months frozen and should be thawed in the refrigerator before dipping or serving.
Use a microwave in 30-second bursts, stirring between intervals, or a double boiler over low heat; avoid overheating to prevent seizing.
This Homemade Mint Candy recipe makes perfectly juicy, tender, and flavorful steak every time! Serve with potatoes and a side salad for an unforgettable dinner in under 30 minutes.
In a mixer bowl, combine 3/4 cup sweetened condensed milk with 1 1/4 teaspoons peppermint extract and 1/8 teaspoon vanilla. Start mixing on low to combine evenly before adding powdered sugar.
Gradually add half of the 4 cups powdered sugar while mixing to avoid a sugar cloud. Continue adding the remaining powdered sugar a little at a time until the mixture forms a cohesive dough that pulls away from the bowl.
Turn dough onto parchment dusted with about 3 tablespoons powdered sugar. Knead briefly, roll to 1/2-inch thickness, and cut 1 to 1 1/2-inch rounds. If the dough softens, chill it in the freezer for 15 minutes.
Place the cut rounds on a parchment-lined baking sheet and freeze for 15 minutes to firm the centers before dipping.
Melt 2 cups dark melting chocolate in a microwave in 30-second increments, stirring between each interval until smooth. Let cool 3–4 minutes to avoid melting the centers on contact.
Dip each chilled center into the melted chocolate using a fork, allowing excess to drip off. Return to the parchment-lined sheet and decorate with sprinkles if desired. Refrigerate for 20 minutes to set.
Last Step: Please leave a rating and comment letting us know how you liked this recipe! This helps our business to thrive and continue providing free, high-quality recipes for you.
Leave a comment & rating below or tag
@festive-cooks on social media!

Crispy, golden Parmesan crusted chicken made in the air fryer for a quick family favorite that stays juicy inside and crunchy outside.

A cozy one-skillet mashup of pot pie comfort and egg noodle ease—ready in about 35 minutes and perfect for weeknight dinners.
A gooey, chocolate-packed loaf with a molten hot-fudge swirl — brownie texture in bread form, perfect warm with a scoop of ice cream.
Leave a comment & rating below or tag @festive-cooks on social media!
Enjoyed this recipe? Share it with friends and family, and don't forget to leave a review!
This recipe looks amazing! Can't wait to try it.
Comments are stored locally in your browser. Server comments are displayed alongside your local comments.

Join to receive our email series which contains a round-up of some of our quick and easy family favorite recipes.