>>

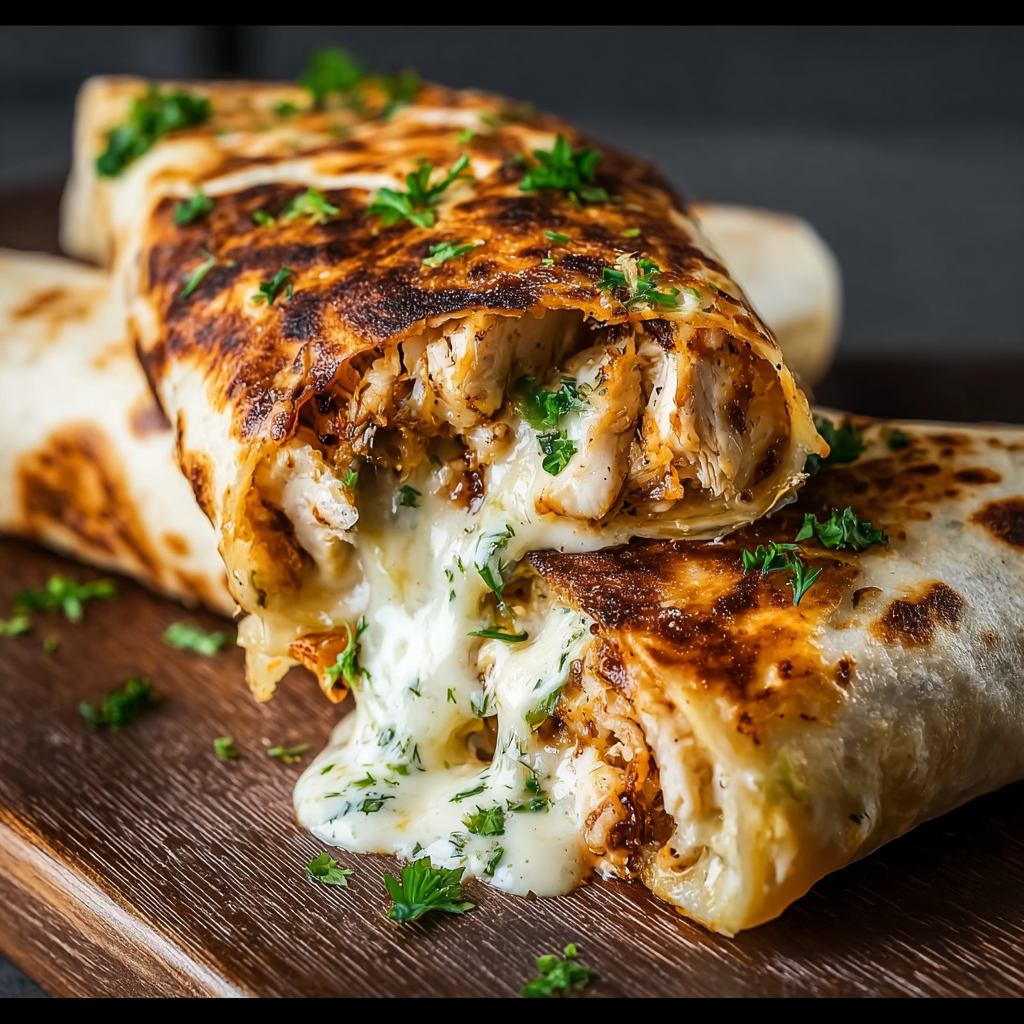
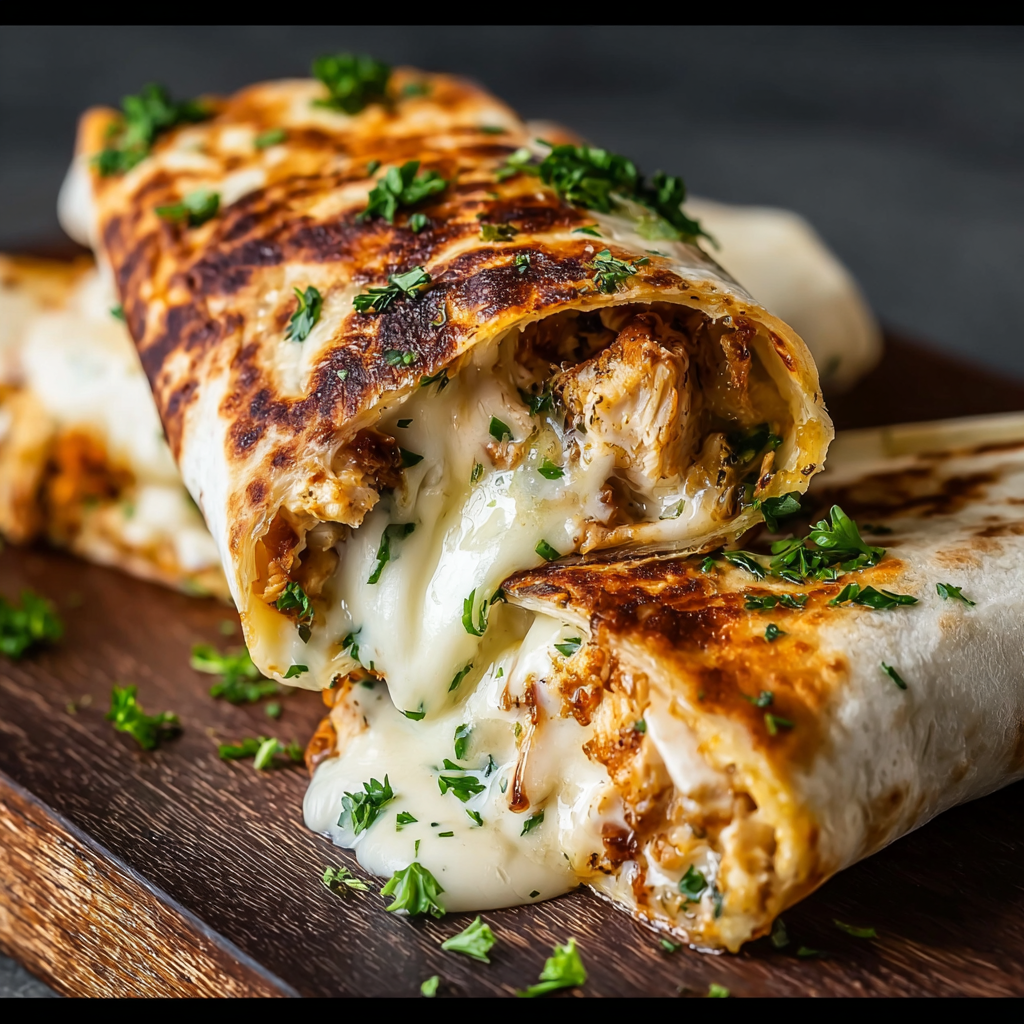
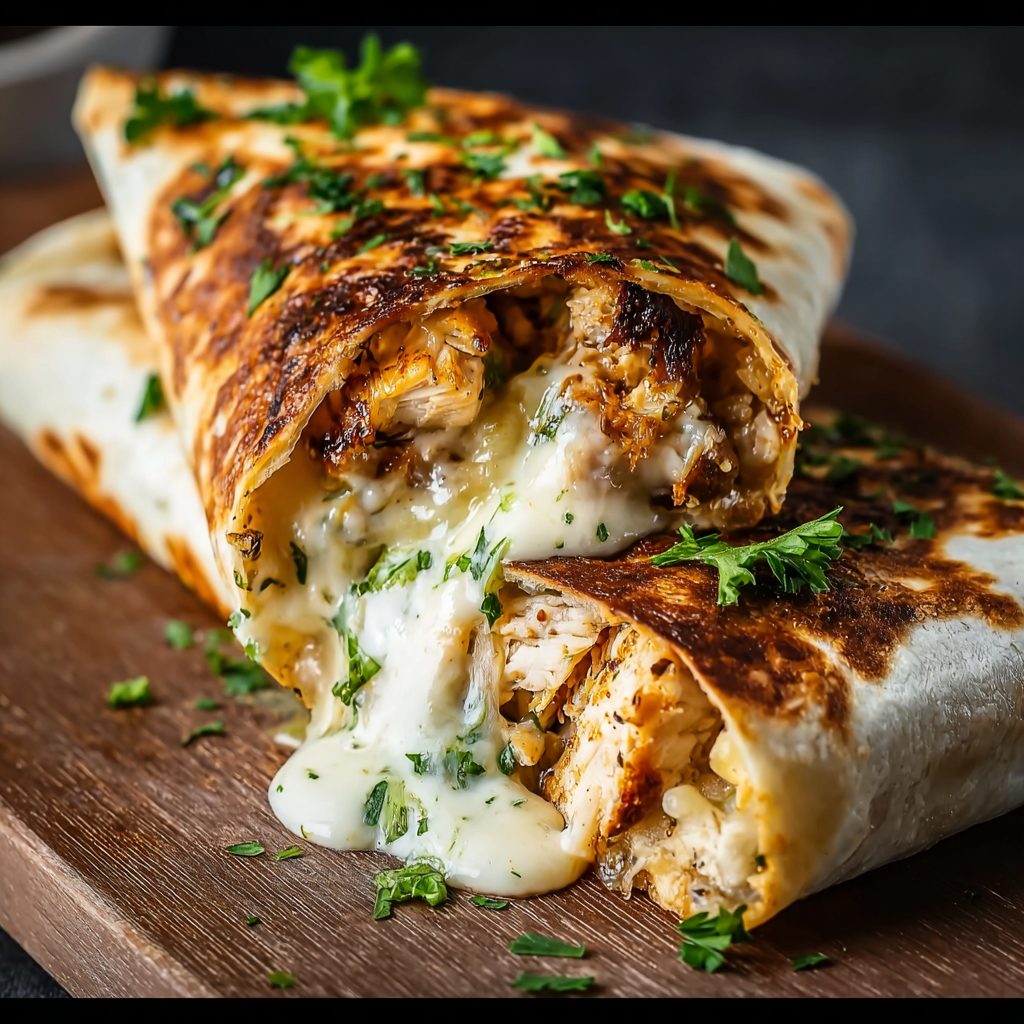
Quick, comforting wraps filled with shredded chicken, garlicky aioli, and melted cheddar — perfect for weeknight dinners, lunch on the go, or a crowd-pleasing snack.
This recipe began as a late-night pantry rescue and quickly became a household favorite. I first put these together after a busy day when I had leftover cooked chicken, a jar of garlic aioli, and a craving for something warm and cheesy. The combination of tender shredded chicken, creamy garlicky sauce, and sharp cheddar wrapped in a warm tortilla felt like comfort food but ready in under 20 minutes. Since then, these wraps have turned up at casual gatherings, after-school snacks, and even a few impromptu picnics.
What makes this combination special is the balance of textures and flavors: the creamy, slightly tangy aioli coats the chicken so every bite is moist; the cheddar melts into gooey pockets of savory richness; and the quick skillet browning adds a crisp outer layer that keeps the wrap satisfying. The recipe is forgiving — you can use rotisserie chicken, leftover roasted chicken, or quickly poach breast pieces and shred them. I often double the filling for a crowd because my family always asks for seconds.
I first learned how satisfying a simple assembly could be when a close friend served a similar version at a potluck. Watching everyone circle back for more convinced me to refine the ratios and technique. My partner’s favorite change was increasing the aioli slightly for extra creaminess, while my teenagers insisted on extra cheddar for ultimate meltiness. Small tweaks like that made this a recipe we all cherish.
My favorite aspect is how reliably comforting these wraps are. I remember serving them after a stormy evening when power flickered intermittently and neighbors dropped by. The warm, garlicky filling and melting cheddar created a cozy feeling that turned the unexpected visitors into an impromptu dinner party. Small meals like this remind me that simplicity and warmth matter most.
Store leftover grilled wraps in an airtight container in the refrigerator for up to 2 days. To prevent sogginess, place a sheet of parchment between layers if stacking. If you plan to store assembled but ungrilled wraps, wrap them tightly in plastic wrap and keep in the fridge for up to 24 hours — grilling straight from chilled condition requires an extra minute per side. For freezing, wrap each ungrilled wrap in plastic and then foil; freeze for up to 3 months. Reheat from frozen in a 350°F oven for 15–20 minutes or in a skillet covered for even heating. Check for hot spots and ensure the center reaches a safe temperature before serving.
To lighten the filling, swap garlic aioli for Greek yogurt mixed with 1 teaspoon Dijon mustard and minced garlic; use a 1-to-1 substitution. For dairy-free versions, choose a dairy-free cheese alternative and use an egg-free mayonnaise. If you need gluten-free wraps, use corn tortillas or certified gluten-free flour tortillas — note that corn tortillas are smaller and may reduce yield. Swap cheddar for Monterey Jack for a milder melt or pepper jack if you want a spicy kick. For a smoky twist, add a teaspoon of smoked paprika to the chicken mixture.
Serve these wraps with a crisp side salad of mixed greens, cucumber, and a lemon vinaigrette to cut through the richness. For a heartier plate, offer roasted sweet potato wedges or a simple tomato soup. Garnish with chopped fresh parsley or chives for color and brightness. If presenting for a crowd, slice each wrap into thirds and arrange on a platter with small bowls of hot sauce, extra aioli, and pickled jalapeños for customization. These work equally well for packed lunches — wrap in foil and include a small ice pack to keep them cool until reheating.
While these wraps are not tied to a single classic cuisine, they reflect the spirit of modern American comfort food — portable, adaptable, and focused on bold but familiar flavors. The idea of filling bread with seasoned meat and cheese appears in many traditions, from Mediterranean wraps to Latin American tacos. The use of garlic aioli nods to European influences where garlic-mayonnaise sauces are common, while the quick skillet crisping evokes the American penchant for toasted handhelds like panini and quesadillas. In my kitchen, blending these elements produces a hybrid that appeals across generations.
In spring and summer, add fresh herbs and crisp vegetables like shredded lettuce, thinly sliced radish, or fresh tomato slices right before serving for brightness. In fall and winter, fold in roasted root vegetables or use leftover Thanksgiving turkey instead of chicken. For holiday warming, mix a teaspoon of Dijon and a pinch of nutmeg into the aioli for subtle autumnal notes. Cheddar can be swapped for a smoked cheese during colder months to add comforting depth. The core technique remains the same, but seasonal produce changes the flavor profile beautifully.
To streamline weekday meals, prepare the filling on Sunday and portion into individual containers. Keep shredded cheese separate to prevent moisture transfer, and assemble wraps the morning you plan to eat them to keep tortillas from becoming soggy. If freezing for grab-and-go breakfasts or lunches, assemble ungrilled wraps and wrap tightly in foil; when reheating from frozen, finish in a hot skillet to restore crispness. Label containers with dates and reheat using a skillet or toaster oven for best texture.
These Cheesy Garlic Chicken Wraps are a testament to how simple ingredients, a few thoughtful techniques, and a little warmth can turn leftovers into something memorable. Whether you’re feeding family, prepping lunches, or hosting a low-key gathering, these wraps have a way of bringing people together around the table — or the skillet.
Use warm, freshly grated cheddar for the best melt and texture; pre-shredded cheese often contains anti-caking agents that can inhibit melting.
If the filling seems dry, stir in an extra tablespoon of aioli or a splash of warm chicken broth to loosen it before assembling.
Press the wrap seam-side down first in the skillet to seal it and prevent unrolling while cooking.
To avoid a burnt exterior with unmelted cheese inside, cook on medium heat and cover the skillet for 30–60 seconds to encourage melting.
This nourishing cheesy garlic chicken wraps recipe is sure to be a staple in your kitchen. Enjoy every moist, high protein slice — it is perfect for breakfast or as a wholesome snack any time.
This Cheesy Garlic Chicken Wraps recipe makes perfectly juicy, tender, and flavorful steak every time! Serve with potatoes and a side salad for an unforgettable dinner in under 30 minutes.
In a medium bowl combine 2 cups shredded cooked chicken with 1/2 cup garlic aioli. Stir until evenly coated, then season with salt and pepper to taste. Adjust aioli to reach desired creaminess.
Lay out 4 large tortillas and divide the chicken mixture among them. Sprinkle 1/4 cup shredded cheddar over each pile, positioning some cheese near the edge to help seal when folded.
Fold the bottom edge of each tortilla up over the filling, fold both sides in, and roll tightly. Tuck the seam underneath to secure contents before cooking.
Heat a nonstick or cast-iron skillet over medium heat with a teaspoon of oil or butter. Place wraps seam-side down and cook 2–3 minutes per side until golden and cheese is melted, pressing gently for even contact.
Let wraps rest for about one minute on a cutting board, then slice in half on the diagonal and serve warm for best texture and cheese pull.
Last Step: Please leave a rating and comment letting us know how you liked this recipe! This helps our business to thrive and continue providing free, high-quality recipes for you.
Leave a comment & rating below or tag
@festive-cooks on social media!

Crispy, golden Parmesan crusted chicken made in the air fryer for a quick family favorite that stays juicy inside and crunchy outside.
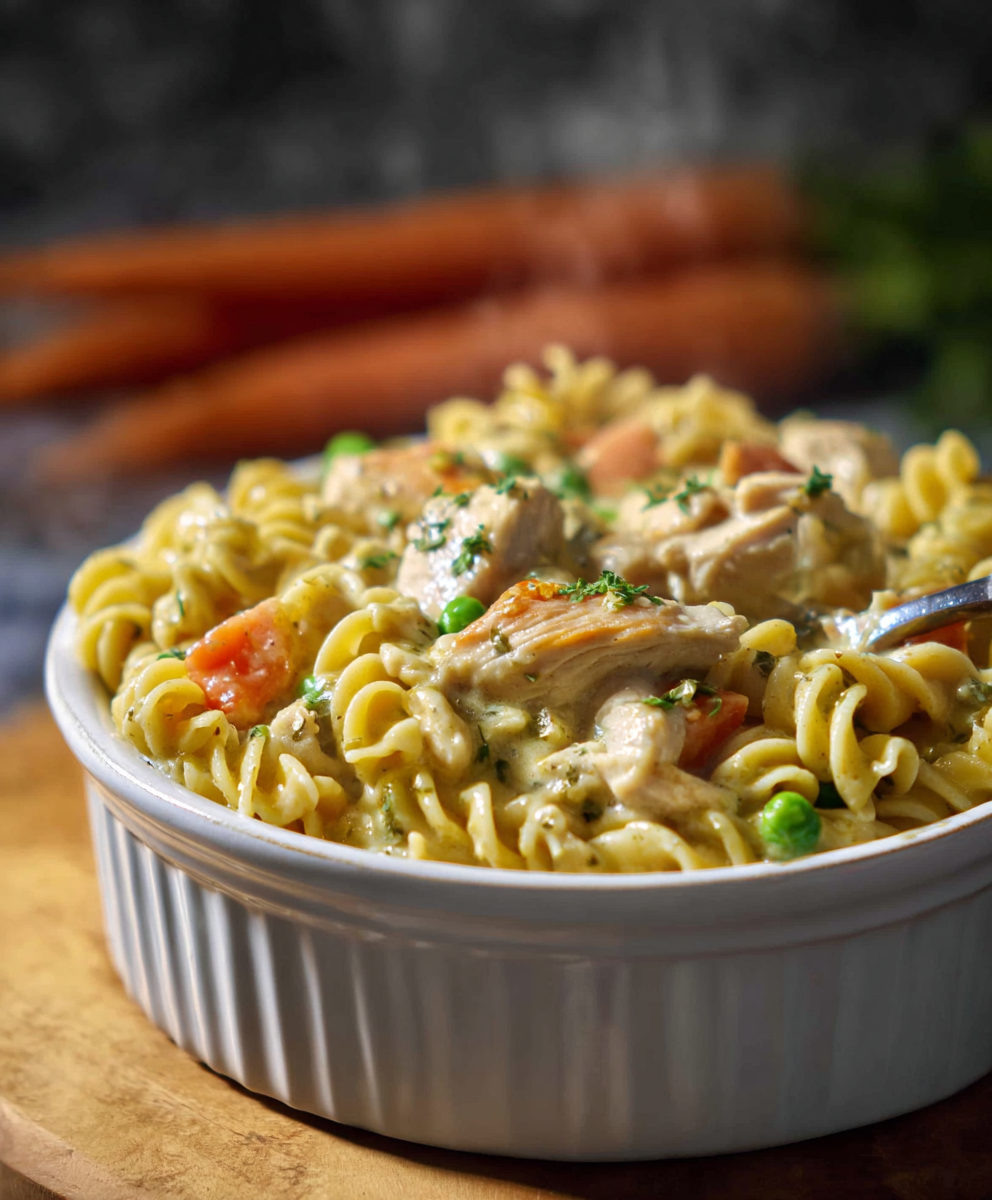
A cozy one-skillet mashup of pot pie comfort and egg noodle ease—ready in about 35 minutes and perfect for weeknight dinners.
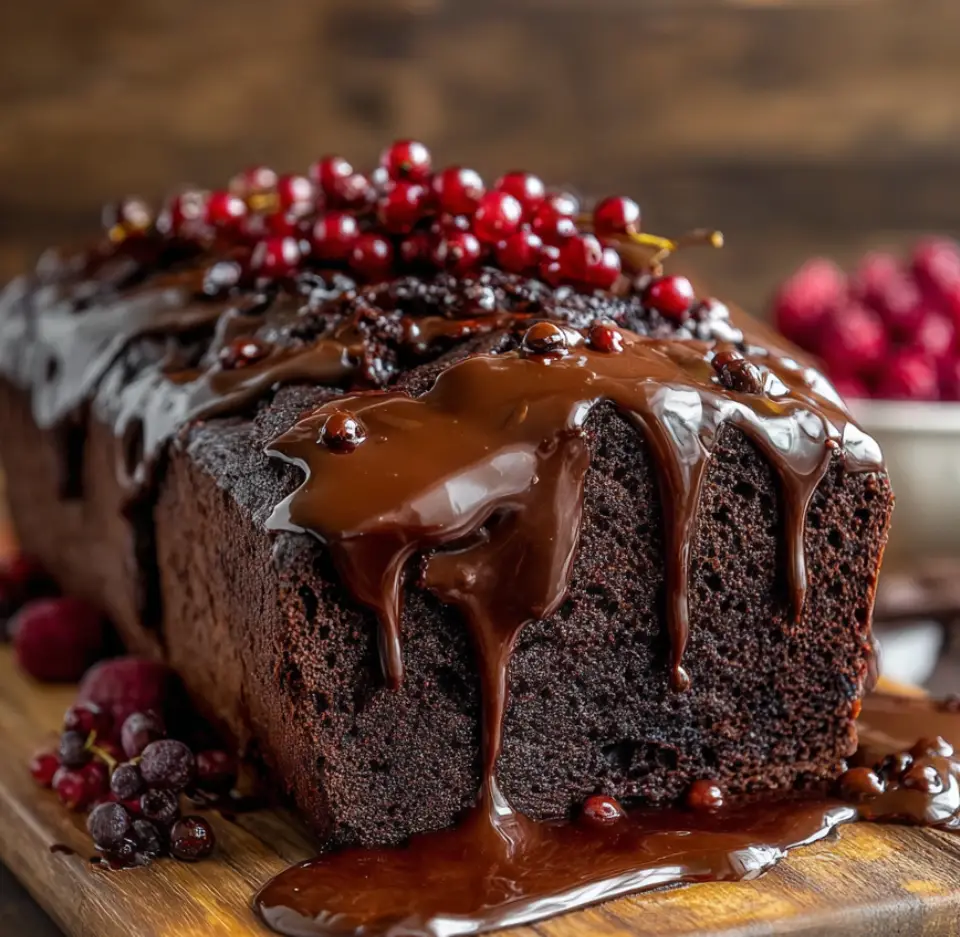
A gooey, chocolate-packed loaf with a molten hot-fudge swirl — brownie texture in bread form, perfect warm with a scoop of ice cream.
Leave a comment & rating below or tag @festive-cooks on social media!
Enjoyed this recipe? Share it with friends and family, and don't forget to leave a review!
This recipe looks amazing! Can't wait to try it.
Comments are stored locally in your browser. Server comments are displayed alongside your local comments.

Join to receive our email series which contains a round-up of some of our quick and easy family favorite recipes.