
Burnt Basque Cheesecake (Loaf Pan Version)

A deeply caramelized, creamy Basque-style cheesecake baked in a loaf pan for easy slicing. Rustic cracked top, custardy interior, and optional toppings for celebration.

This Burnt Basque cheesecake has become my go-to for celebrations and quiet weekend baking. I first encountered this style in a cramped tapas bar while traveling in northern Spain and recreated the charred top and creamy center at home. I adapted the classic round cake to a loaf pan so it slices neatly for brunch, potlucks, and gift boxes. The contrast between the smoky, caramelized exterior and the lusciously smooth interior is what keeps everyone coming back for more.
I discovered this loaf-pan adaptation one rainy afternoon when I had limited oven space but wanted the dramatic dark top and custard-like texture. Using a high oven temperature and a shallow, well-lined loaf pan gives the crackled, almost burnt surface Basque cheesecakes are famous for, while the interior stays pillowy and rich. It is forgiving, quick to assemble, and the ingredients are pantry and fridge staples: cream cheese, sugar, eggs, cream, flour, and a pinch of salt. With simple tools and a few technique notes, you can produce bakery-quality slices that are both elegant and homey.
Why You'll Love This Recipe
- Produces a dramatic caramelized top with a silky custard interior using only basic ingredients and one pan; no water bath needed.
- Ready from start to finish in about 70 minutes, including baking and cooling; ideal for last-minute guests or weekend baking.
- Loaf pan format creates clean slices for breakfast boards, dessert platters, or gifting, unlike the classic tall round version.
- Uses pantry staples and flexible swaps; you can use lighter cream or gluten-free flour to suit dietary needs without losing texture.
- Make-ahead friendly: chill overnight to improve texture and slice easily; freezes well for up to two months wrapped tightly.
- Crowd-pleasing and elegant; pairs beautifully with simple whipped cream and berries for contrast and brightness.
My family immediately dubbed this loaf the ‘‘party cake’’ after the first test. We served it at a small dinner and watched it vanish—neighbors returned for seconds. Over time I tweaked oven temperatures and lining technique to perfect the burnt top while keeping the center custardy. It’s become a recipe I turn to when I want something impressive with minimal fuss.
Ingredients
- Full-fat cream cheese (16 ounces): Room temperature is crucial for smooth blending. I usually buy block-style, like Philadelphia, and leave it on the counter 30 minutes. Higher-fat brands yield a richer mouthfeel.
- Granulated sugar (3/4 cup): Dissolves into the batter and helps caramelize the top. If you prefer a deeper caramel flavor, swap 1 tablespoon for light brown sugar.
- Large eggs (3): At room temperature to reduce curdling when combined with the cheese; they provide structure while keeping the center creamy.
- Heavy cream (1 cup): Contributes to a custardy interior. You can use a lighter cream if desired but expect a slightly less rich texture.
- All-purpose flour (1/4 cup): A small amount to stabilize the custard. Use a gluten-free 1-to-1 blend if avoiding gluten.
- Salt (1/4 teaspoon): Enhances sweetness and rounds the flavor; flaky finishing salt over slices is optional.
- Optional toppings: Whipped cream, fresh berries, or caramel sauce add brightness and contrast to the burnt top.

Instructions
Preheat and prepare the pan: Preheat the oven to 425°F. Line a 9x5-inch loaf pan generously with parchment, allowing the paper to extend well above the rim. The extra parchment protects the sides and helps produce the dramatic dark top while containing any oven-spatter. Soften and beat the cream cheese: Beat 16 ounces of room-temperature cream cheese in a mixing bowl with a whisk or hand mixer on medium speed until smooth and free of lumps, about 1 to 2 minutes. Scrape the bowl to avoid pockets of cold cheese which cause graininess. Add sugar and eggs: With the mixer running, add 3/4 cup granulated sugar and beat until glossy. Add the eggs one at a time, beating briefly after each addition until the mixture is homogeneous. Avoid overbeating to prevent excess air, which can cause cracking. Incorporate cream and dry ingredients: Pour in 1 cup heavy cream and mix on low until combined. Sift in 1/4 cup all-purpose flour and 1/4 teaspoon salt, folding gently until no streaks remain. A few small bubbles are fine; they contribute to a light interior without large holes. Transfer and bake: Pour the batter into the prepared loaf pan. Tap the pan once on the counter to release large air pockets. Bake at 425°F for 15 minutes, then reduce heat to 400°F and continue baking 25 to 35 minutes until the top is deeply browned and has a cracked surface. The center should still jiggle slightly when nudged. Cool and chill: Remove from the oven and cool on a wire rack for 1 hour. Then refrigerate at least 4 hours or overnight to set. The resting time improves texture and makes slicing neater.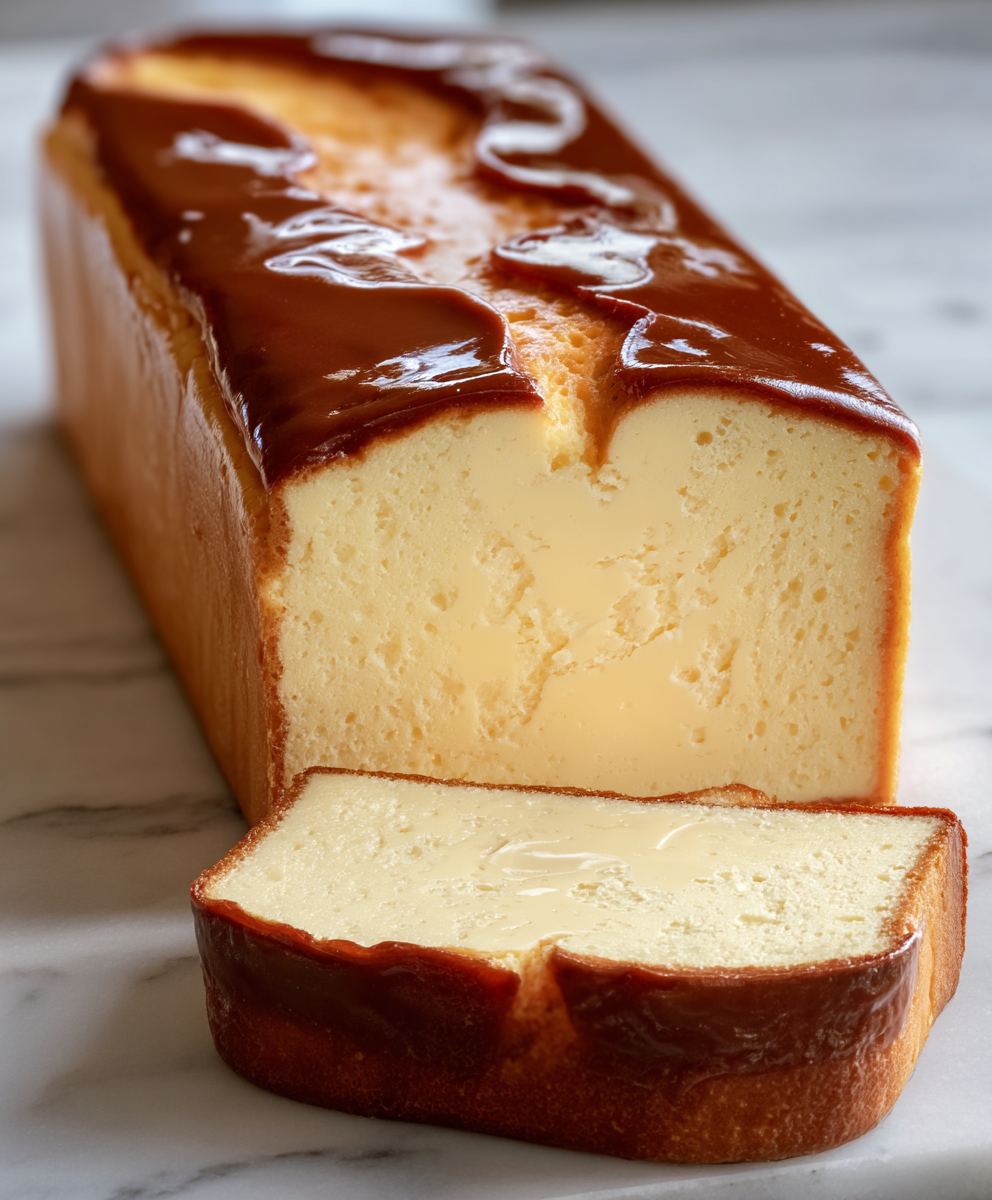
You Must Know
- The dark top is intentional: a deeply caramelized surface balances the rich interior and adds savory notes.
- Chill thoroughly before slicing; warm cheesecake will be too soft and will not hold neat slices.
- Freezes well up to two months when wrapped tightly; thaw overnight in the refrigerator for best texture.
- High oven heat is key to achieving the burnt exterior without overbaking the center; monitor closely between 35 and 45 minutes.
My favorite part is the contrast of textures and flavors. The smoky top gives a hint of bitterness that makes the sweet, silky inside taste even more decadent. Family and guests often ask how I got the dramatic top; I tell them the secret is simple: high heat, good parchment coverage, and patience during chilling. It reads like a bakery cake but takes a home cook under an hour of active time.
Storage Tips
Store slices in an airtight container in the refrigerator for up to five days. Place parchment or wax paper between slices to prevent sticking. For longer storage, wrap slices individually in plastic wrap and then in aluminum foil, and freeze for up to two months. Reheat gently at 300°F for 8 to 10 minutes if you prefer warm slices, or thaw overnight in the refrigerator before serving to preserve texture.
Ingredient Substitutions
If you need a lighter option, substitute half-and-half for heavy cream, but expect a slightly less rich custard. For a gluten-free loaf, use a 1-to-1 gluten-free flour blend for the 1/4 cup of flour; this stabilizes the custard without altering flavor. Brown sugar can replace a tablespoon of granulated sugar for deeper caramel notes, and dairy-free cream cheese and plant-based cream work in a pinch but will change mouthfeel and set.
Serving Suggestions
Serve slices with a dollop of freshly whipped cream and a scattering of berries to cut through the richness. A drizzle of warm caramel sauce adds a sticky sweetness that complements the smoky top. For a brunch board, pair with sliced pears, toasted nuts, and shortbread for texture contrast. A light dusting of flaky sea salt on finished slices adds a professional finish.
Cultural Background
Originating in the Basque region of Spain, this style intentionally embraces a burnt surface to create complex, caramelized flavors. The modern Basque version became widely known from pintxos bars and a handful of influential bakeries. It celebrates minimalism: few ingredients, bold technique, and a rustic appearance that contrasts with its luxurious texture. Variations exist across Spain and the world, but the core idea remains: intense exterior, creamy interior.
Seasonal Adaptations
In summer, serve with fresh stone fruit and a citrusy whipped cream to brighten the rich flavors. In fall and winter, fold a tablespoon of pumpkin puree with warm spices into the batter for a spiced variation. During holidays, top slices with candied nuts or spiced caramel to make the loaf feel celebratory. The base is versatile and pairs well with seasonal fruit and sauces.
Meal Prep Tips
Make the loaf two days ahead and refrigerate to free up time on the day of serving. Slice and pack individual portions into containers for grab-and-go breakfasts or desserts. For freezing, pre-slice and space slices on a tray to flash-freeze before wrapping to prevent sticking. This cheesecake is practical for hosting because it improves in texture after chilling.
There is something comforting about sharing a cake that looks dramatic but is straightforward to make. Whether for a casual brunch or a special gathering, this loaf-pan version of a Basque cake has become a household favorite and a reliable showstopper. I encourage you to try the high-heat method, chill thoroughly, and experiment with seasonal toppings to make it your own.
Pro Tips
Use room-temperature cream cheese and eggs to ensure a smooth, lump-free batter.
Line the pan with parchment that extends above the rim to prevent drips and encourage an even burnt top.
Do not overbeat after adding eggs to minimize incorporated air and reduce cracking.
Chill for at least 4 hours or overnight for the best texture and neater slices.
This nourishing burnt basque cheesecake (loaf pan version) recipe is sure to be a staple in your kitchen. Enjoy every moist, high protein slice — it is perfect for breakfast or as a wholesome snack any time.
Tags
Burnt Basque Cheesecake (Loaf Pan Version)
This Burnt Basque Cheesecake (Loaf Pan Version) recipe makes perfectly juicy, tender, and flavorful steak every time! Serve with potatoes and a side salad for an unforgettable dinner in under 30 minutes.
Ingredients
For the Cake
Optional Toppings
Instructions
Preheat and prepare the pan
Preheat oven to 425°F. Line a 9x5-inch loaf pan completely with parchment, leaving paper extending above the rim to protect the sides and capture the caramelization on top.
Beat the cream cheese
Beat 16 ounces room-temperature cream cheese until smooth and lump-free, about 1 to 2 minutes. Scrape the bowl to ensure even texture and avoid cold pockets.
Add sugar and eggs
Add 3/4 cup granulated sugar and beat until glossy. Add 3 eggs one at a time, mixing briefly after each addition to maintain a cohesive batter without over-aeration.
Incorporate cream and flour
Mix in 1 cup heavy cream on low until combined. Sift in 1/4 cup all-purpose flour and 1/4 teaspoon salt, folding gently until no streaks remain to stabilize the custard.
Bake the loaf
Pour batter into the lined pan, tap to release large bubbles. Bake at 425°F for 15 minutes, then reduce to 400°F and bake 25 to 35 minutes until top is deeply browned and center jiggles slightly.
Cool and chill
Cool on a wire rack for 1 hour, then refrigerate at least 4 hours or overnight. Chill before slicing for neat pieces and improved texture.
Last Step: Please leave a rating and comment letting us know how you liked this recipe! This helps our business to thrive and continue providing free, high-quality recipes for you.
Nutrition
Did You Make This?
Leave a comment & rating below or tag
@festive-cooks on social media!
Categories:
You might also like...

Air Fryer Parmesan Crusted Chicken
Crispy, golden Parmesan crusted chicken made in the air fryer for a quick family favorite that stays juicy inside and crunchy outside.

Quick Chicken Pot Pie Pasta
A cozy one-skillet mashup of pot pie comfort and egg noodle ease—ready in about 35 minutes and perfect for weeknight dinners.
Hot Fudge Brownie Bread
A gooey, chocolate-packed loaf with a molten hot-fudge swirl — brownie texture in bread form, perfect warm with a scoop of ice cream.
Did You Make This?
Leave a comment & rating below or tag @festive-cooks on social media!
Rate This Recipe
Share This Recipe
Enjoyed this recipe? Share it with friends and family, and don't forget to leave a review!
Comments (1)
This recipe looks amazing! Can't wait to try it.
Comments are stored locally in your browser. Server comments are displayed alongside your local comments.

Hi, I'm Jessica!
What's Popular
30-Minute Meals!
Join to receive our email series which contains a round-up of some of our quick and easy family favorite recipes.